How to use Codeless Barcode Generation feature in ReportViewer RDLC local reports in ASP.NET
Product Barcode Professional for ASP.NET
Published 06/21/2011
Updated 06/21/2011
Overview
You can easily generate and display linear, postal & 2D barcodes in RDLC local reports in ASP.NET by using a very simple yet powerful feature called "Codeless Barcode Generation" provided by our Barcode Professional for ASP.NET product.
Requirements
Neodynamic Barcode Professional 7.0 for ASP.NET
Microsoft .NET Framework 2.0 (or greater)
Microsoft Visual Studio 2008 / 2010
Microsoft Visual Web Developer (VWD) 2008 / 2010 Express Editions
In short, Codeless Barcode Generation (CBG) is a feature that lets you to render barcode images on ASP.NET or simple HTML pages by just setting up an especial/formatted URL to an HTML's IMG tag without the need of coding VB or C# sentences for barcode rendering. The CBG just needs you add an entry to your web.config file and it will ready to go.
Using CBG in RDLC reports has the following benefits:
- You do not need to write any code! Just add an Image control on your report and set it to the especial/formatted URL provided by CBG. For example, rendering a Code 128 barcode for the value "ID032929" you would do that as follows:
http://your-website/BarcodeGen.axd?S=Code128&C=ID032929
- By using CBG feature, you can easily display barcode images in the Header & Footer sections of the RDLC report, something that requires lots of tricks if using other approaches.
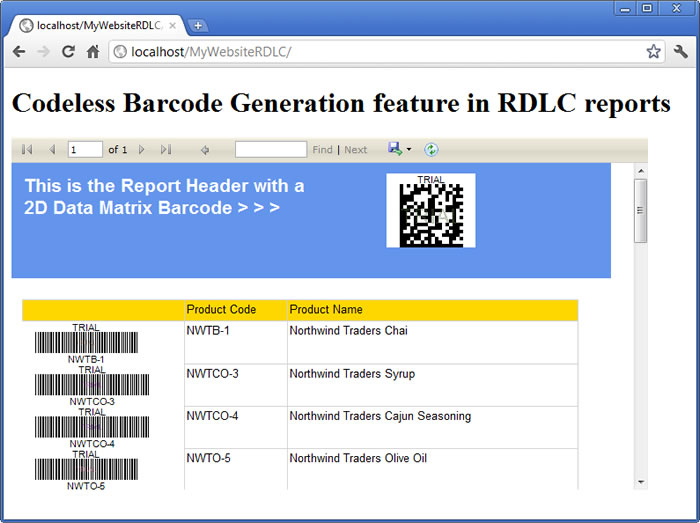
In the following guide, you will learn how to configure CBG feature and use it to generate and display a 2D DataMatrix barcode in the report's header section and Code 39 linear barcodes for a list of products based on Northwind DB sample. The following figure shows the report with the barcodes:
 The sample RDLC report displaying a 2D DataMatrix as well as Code 39 barcodes for Northwind DB sample products
To reproduce it, please follow up these steps:
- Open Visual Studio or VWD 2010 and create a new website project http://localhost/MyWebsiteRDLC
NOTE: the website needs to be created and hosted in IIS.
- Download and install Barcode Professional for ASP.NET. After that, add a reference to Neodynamic.WebControls.BarcodeProfessional.dll assembly to your website.
- Configure the Codeless Barcode Generation feature into your web.config file.
If you are using IIS 7.0 or greater, then add the CBG entry under the <handlers> node of <system.webServer> like follows:
<system.webServer>
    <handlers>
        <add name="BarcodeGen" verb="*" path="BarcodeGen.axd" type="Neodynamic.WebControls.BarcodeProfessional.BarcodeProfessional, Neodynamic.WebControls.BarcodeProfessional" />
    </handlers>
</system.webServer>
If you are using IIS 6, then add the CBG entry under the <httpHandlers> node of <system.web> like follows:
<system.web>
    <httpHandlers>
        <add verb="*" path="BarcodeGen.axd" type="Neodynamic.WebControls.BarcodeProfessional.BarcodeProfessional, Neodynamic.WebControls.BarcodeProfessional" />
    </httpHandlers>
</system.web>
- That's it! The Codeless Barcode Generation feature is ready to be used!
- Now, create a new RDLC Local report naming it MyBarcodeReport.rdlc
- We'll be displaying a 2D DataMatrix barcode on the header. So, add a Header to the report and add to it an Image control from the toolbox. In the Image control set the source to "External" and the Value to this:
="http://localhost/MyWebsiteRDLC/BarcodeGen.axd?S=DataMatrix&C=ReportID-091230913"
That's the especial/formatted URL which tells to Barcode Professional to generate a 2D DataMatrix barcode for the value "ReportID-091230913". In this case we're using fixed data but you can replace it by a param or any data source field of your report!
- Now, in the body of the report, we'll list products from the Northwind DB sample. For each product, we'll display its code and name. For the code, we'll be generating a linear Code39 barcode.
- First of all, add a new data source to your report. To do that, select View > Report Data from VS 2010 menu bar. In the Report Data pane, click New > Dataset...
- In the Dataset Properties dialog box, click on "New" button for adding a new Data source. In this sample we created a small Access MDB file containing only the Products table of Northwind DB sample which is available here Northwind.mdb
Use it as your data source please by following up the VS wizard.
- After you created a new dataset for your report, please drag & drop a Table control from toolbox onto your report's body. Add the two ProductCode and ProductName fields to the table and add a new Image control for the first column. In the Image control set the source to "External" and the Value to this:
="http://localhost/MyWebsiteRDLC/BarcodeGen.axd?S=Code39&C=" + Fields!ProductCode.Value + "&AC=False&BH=0.25&DC=True"
Notice how we used the ProductCode field into the especial URL! It's just that easy.
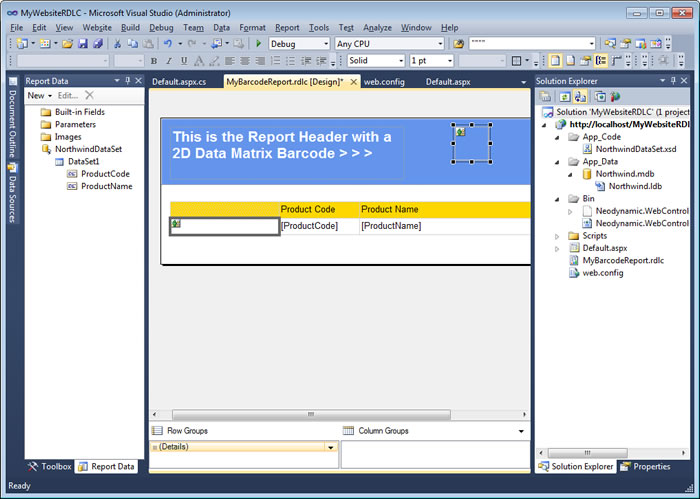
- At this point, your report should look as follows:
 The Visual Studio IDE - The RDLC report with the Image controls for displaying the barcodes generated by using Codeless Barcode Generation feature.
- Finally, open the default.aspx file and add a new ReportViewer control. Set it to display the MyBarcodeReport.rdlc file and set up the data source too! After that, go to the class behind file of such page and add the following line of code into the Page_Load event handler:
VB
ReportViewer1.LocalReport.EnableExternalImages = True
C#
ReportViewer1.LocalReport.EnableExternalImages = true;
This line is for enabling the RDLC can display external images which are the one we used for the barcodes.
- That's it! If you run/test your website, you should get the RDLC report displaying 2D Data Matrix and Code 39 barcodes without a line of code!
 Codeless Barcode Generation feature in RDLC reports


